PublicPassword - Chaining Exploits
Background
A few months ago there was an explosion of Linux kernel privilege escalation exploits, during this time two major exploits were released targeting different parts of the system. I’d been testing both and got an interesting idea: what if I chained them?
CVE-2026-31431
More widely known as CopyFail, CVE-2026-31431 was a CVSS 7.8 high severity kernel exploit that has existed in Linux since 2017. This is a complex bug that involves writing arbitrary data to the page cache of a file you own a file descriptor (reference to an open file) for. CopyFail achieves this in such a way that the page cache is not invalidated, and as the file doesn’t change on the disk, it’s not detectable by file integrity monitoring. This results in the ability to modify any file on the system, persisting only until the page cache is cleared. The official PoC is found here and essentially overwrites the start of /usr/bin/su in 4-byte chunks to execute /bin/sh, granting a root shell.
An official writeup for CopyFail can be found here.
CVE-2026-46333
Lesser known during this time due to its slightly lower impact and the hype around CopyFail, was CVE-2026-46333. This is a bug in Linux’s __ptrace_may_access() function, which controls whether a process is allowed to read/control another process. Normally, when a process is running as root for example, a regular user cannot read its metadata as this may expose secrets and permit privilege escalation. Unfortunately for the average user or server admin, there was a flaw in this function caused by memory being released for the privileged process too early, creating a brief window that an unprivileged process can race a privileged process’s shutdown to access core metadata. As I’ll explain below, this allows the attacker to read files such as /etc/shadow and private SSH host keys.
The Idea
By the time CVE-2026-46333 was publicly disclosed, I’d been experimenting with CopyFail for some time and looking for new ways to use it for escalation. The original exploit overwrites a setuid binary, and while this works well across all systems due to these programs automatically running as root, it could interfere with normal operation if a commonly used binary is targeted.
As a SOC analyst and someone who runs a lot of servers myself, low impact and low visibility is the way to go if you want to run an effective and stable attack. Even though it can be mitigated if you clean up after yourself quickly, I wanted to see if I could avoid that chance of disrupting the victim’s other processes.
Other researchers had already developed a version of the exploit in pure Python which changed your UID in /etc/passwd to 0 like root’s, but this could also introduce instability as now anything logging in as the target user will be accessing files as root, potentially locking them out and causing damage after /etc/passwd is reverted.
My solution was RootRemover, which removes the root user’s password on Debian-based systems. And while this was quite effective and causes minimal to no distruption to normal operations, it only worked on Debian and its derivatives. I also had never chained two exploits together, and just thought that would be pretty cool.
This is where CVE-2026-46333 comes into play.
The Passwd File
The reason my approach in RootRemover only works on Debian is because of how it removes the root password.
Normally, a user with a password will have an entry like this in /etc/passwd:
1
root:x:0:0:root:/root:/usr/bin/zsh
This follows the syntax shown below, the x indicating the password is stored in the /etc/shadow file.
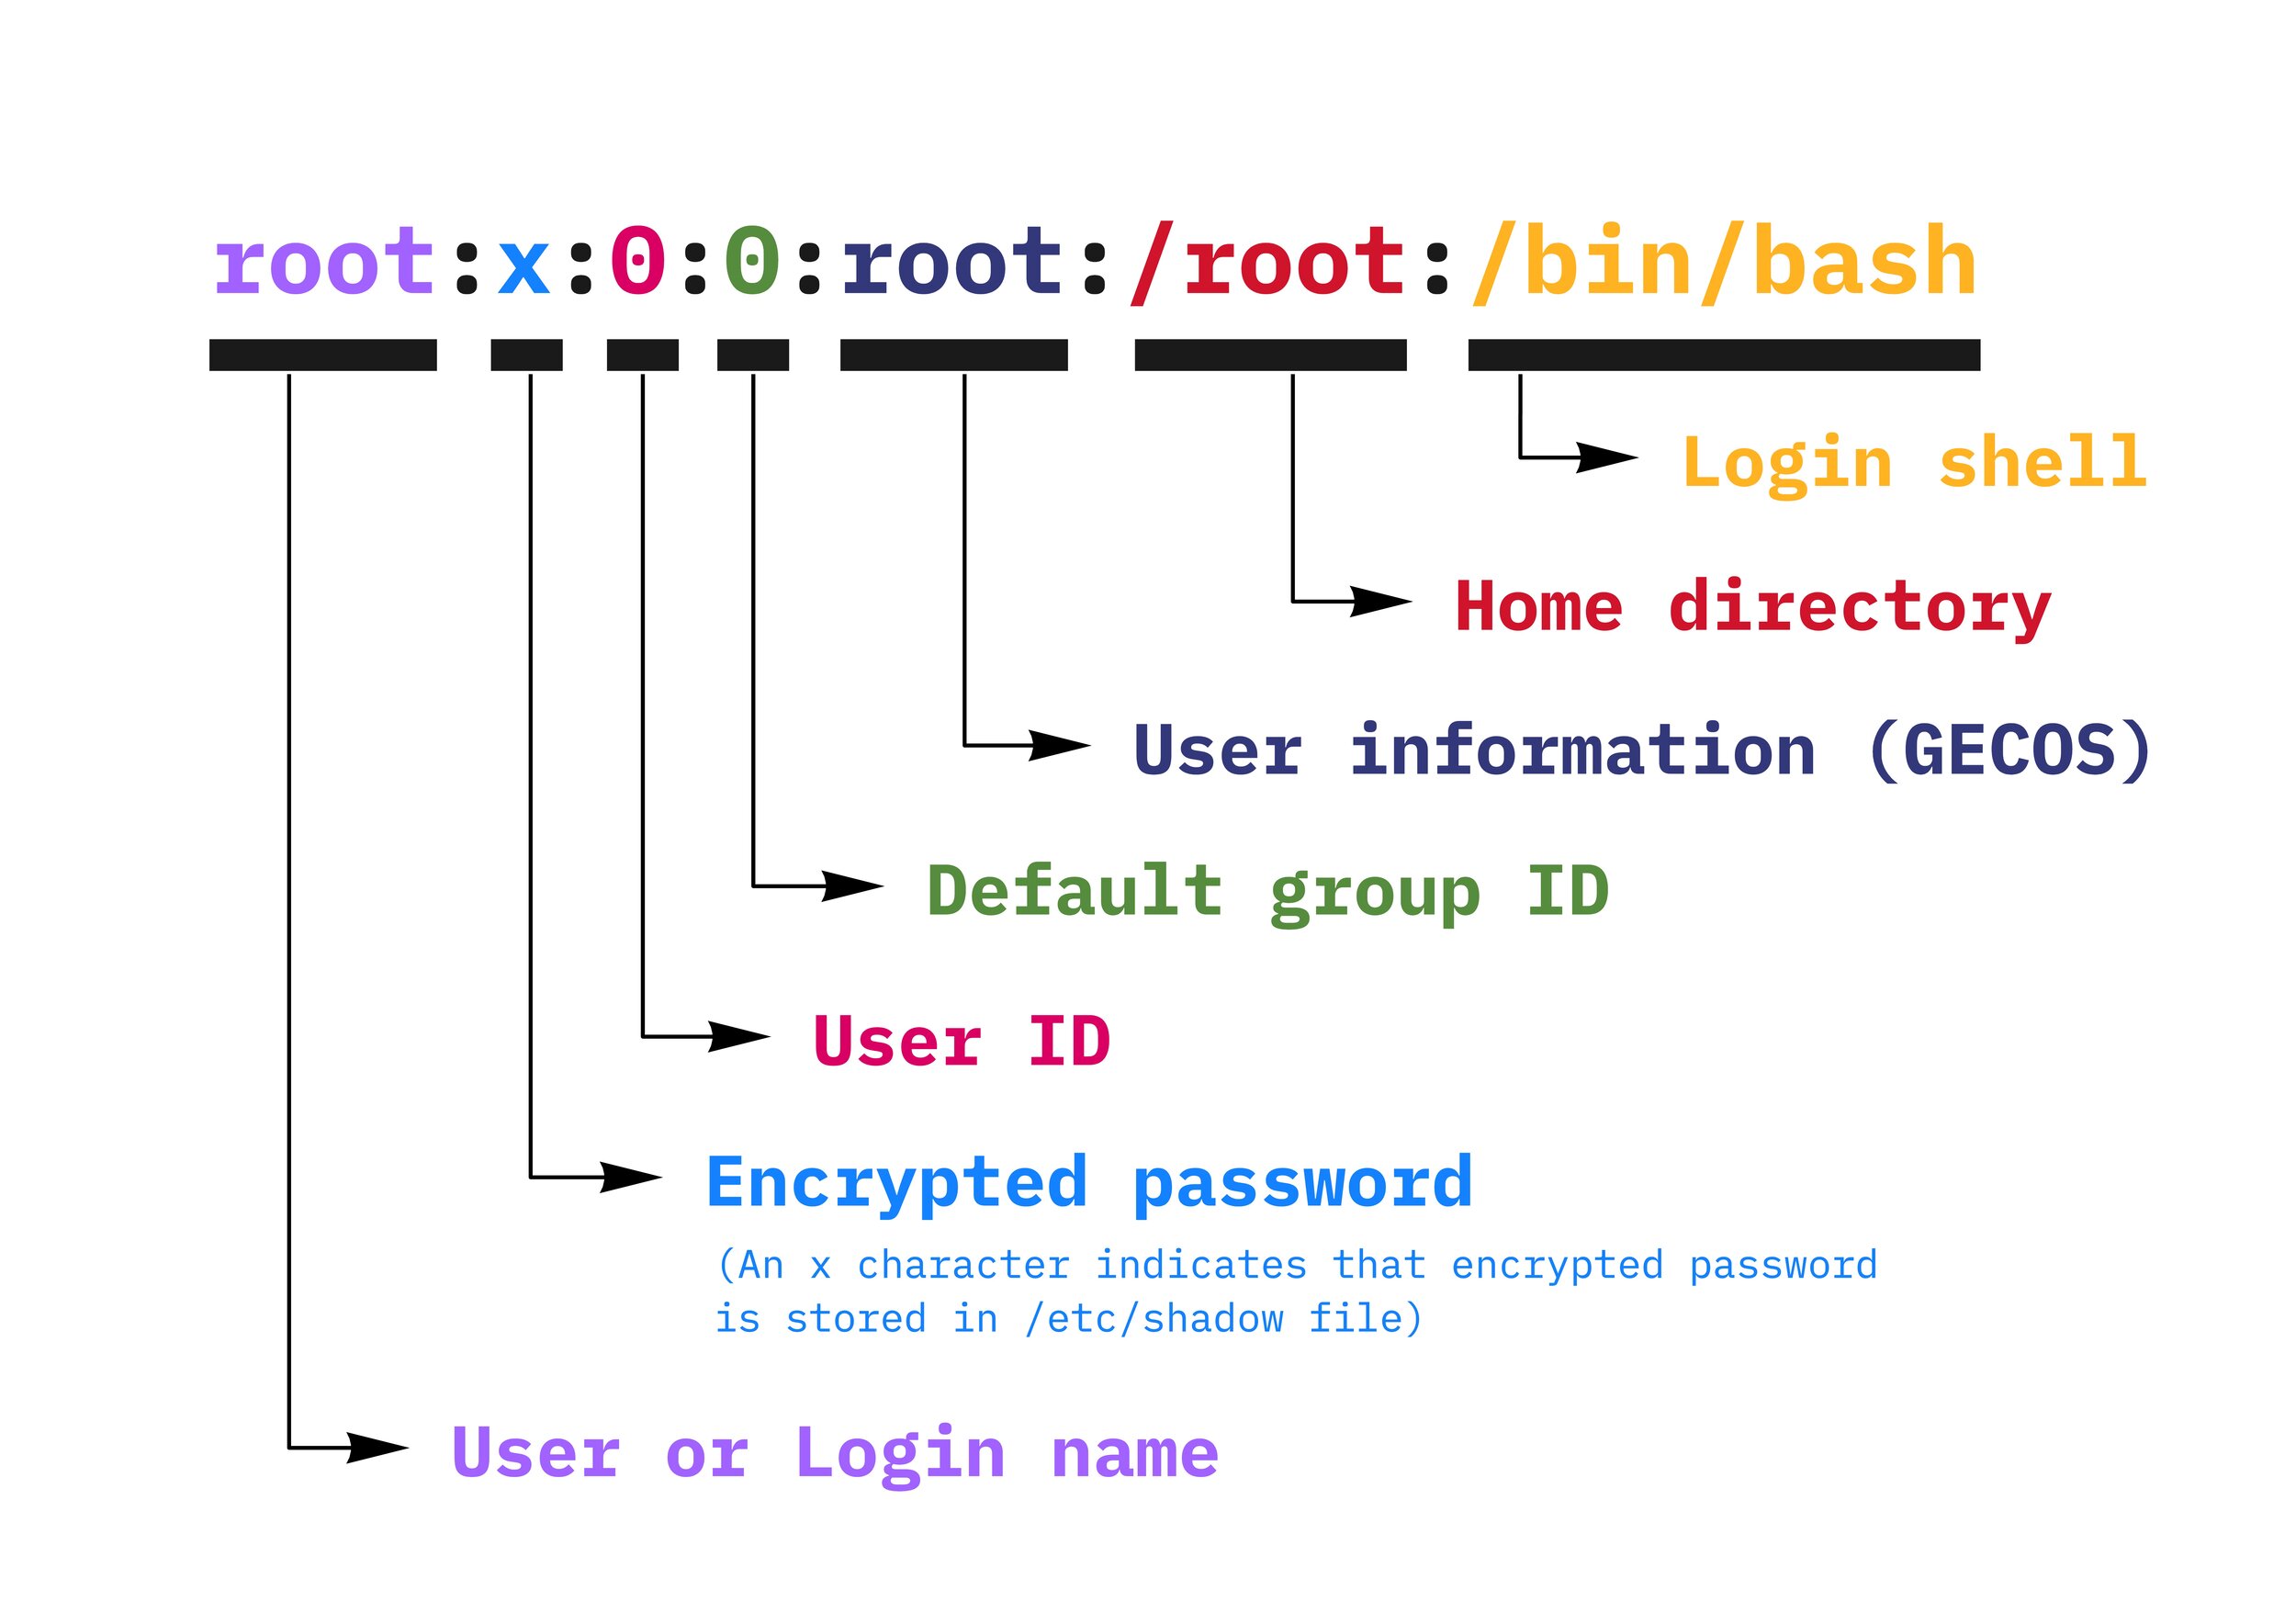 Source: Stratosphere Research Laboratory
There are a few other characters that can go in this place too:
1
2
lockedout:!:1000:1000:user is locked out:/home/lockedout:/usr/bin/zsh
nopassword::1001:1001:user does not need password:/home/nopassword:/usr/bin/zsh
You can also add a password hash in the same format they appear in /etc/shadow and skip using the shadow file entirely, but this would expose the hash.
RootRemover removes the root password by essentially replacing a :x:0 or :!:0 with ::00. This is still valid syntax, and means the user no longer needs to use a password to sign in.
1
2
3
root:x:0:0:root:/root:/usr/bin/zsh
--- TO --->
root::00:0:root:/root:/usr/bin/zsh
This uses the 4 bytes we are permitted to replace by CopyFail and requires only one write, however most Linux distros actually ignore an empty password field in an entry, and either check /etc/shadow or deny the authentication entirely.
Changing The Password
This led to another thought: what if we could change the user’s password? CopyFail doesn’t really let us do this easily. We can’t use it to extend the file and add a hash directly, and we can’t write too close to the end of the file either. We’d have to destroy several users to make this happen, which would no longer be minimal impact. Unfortunately, we can only use CopyFail to write to files we can read, so we can’t just replace a hash in the shadow file either.
Unless?
Remember how CVE-2026-46333 lets us read some files we normally wouldn’t have access to? Including /etc/shadow?
Because of CopyFail, we can write where we can read, and because of CVE-2026-46333 we can read the shadow file. This has now become more of an experiment than a practical exploit chain; it was already more than possible to escalate to root without doing any of this, but let’s entertain the thought.
- Existing methods of CopyFail either:
- Overwrite system binaries, removing normal functionality
- Replace a user’s UID with 0, causing potential permission issues later
- Or only work on Debian
- There’s a high risk of impacting other services on the system, or low compatibility.
Changing a user’s password instead still has drawbacks; if any script or service uses a password to log in and start executing, it would get blocked by a password change. But you shouldn’t be setting up your services to require a user password anyway. Generally a service manager starts as root and drops to a lower user, and most services that might remote in from another host would use an SSH key instead. This is not no distruption, but would still be minimal distruption on most systems.
More on that later though - some surprising discoveries were made.
PublicPasswd
Getting Read
Everything in Linux is a file. Your photos and documents are files, the same way they are anywhere, but on Linux your network connections are also a file. Your console windows are a file - you can write to someone else’s terminal using echo if you have permission. So how do we reference these? Do we need a string path like we often see? Sometimes, but more often the kernel uses file descriptors.
A file descriptor is like a reference to an open file, and every process has these. They’re represented in numbers starting from 0, and the first three are usually the same:
- 0 - stdin / standard input
- 1 - stdout / standard output
- 2 - stderr / standard error
Standard input is read-only to the process, and standard output and error are write-only. You see these files when you interact with a shell on your Linux machine. First stdin reads your commands, then stdout writes the output, or if there was an error, stderr reports it. These files are local to each process and usually don’t have a location in the filesystem hierarchy, so you can’t reference them by name… usually.
Whenever you open a file, your process gets a new file descriptor assigned. The kernel checks whether you are allowed to read/write the file, and then if your permissions align with how you opened the file, it creates the descriptor and gives it back to you. This check is only done when you first open the file. Once you have that file descriptor, you can always operate on that file until you close it. The file descriptor stores whether the file is opened for reading or writing, where the file is, and where you are in the file.
This normally just resides within the kernel, but most modern distros support procfs, or /proc, which provides an abstraction allowing for deeper process inspection without complex tools.
You can view all file descriptors belonging to a process by running ls /proc/<PID>/fd as long as you have permission. Generally you can only view this information for your own user, and this is enforced by the __ptrace_may_access() function. However, due to CVE-2026-46333, there’s a moment when a process is closing that this information is unprotected. During this time, you can view the file descriptors of a process no matter what permissions you’d normally have over it. As these file descriptors are represented here as symbolic links, you can also work out where they exist on the disk using readlink.
This is how we work out where files in use by systemd are:
1
2
$ sudo readlink /proc/1/fd/127
anon_inode:[pidfd]
This one doesn’t have a filesystem path.
We can also inspect our own zsh shell and see an autocompletions file open:
1
2
$ readlink /proc/99522/fd/16
/usr/share/zsh/functions/Completion/Zsh.zwc
But what procfs allows us to do is easily enumerate file descriptors owned by a process, so if these descriptors aren’t closed before the service starts exiting, we can list them all and then read the actual location of the file they link to. The following snippet is how we do this in PublicPasswd:
1
2
3
4
5
6
7
8
9
10
11
12
13
14
15
            for chage_fd in range(3, 32):
                fd_copy: int = libc.pidfd_getfd(pfd, chage_fd, 0)
                # pidfd_getfd errored, try again
                if fd_copy < 0:
                    continue
                # Find out which file this leads to
                file: str = os.readlink("/proc/self/fd/" + str(fd_copy))
                if file == "/etc/shadow":
                    # Seek back to the start of the file for
                    # easier reading
                    os.lseek(fd_copy, 0, os.SEEK_SET)
                    return fd_copy
                # Close the file if not shadow, stops us opening too many files
                # for the OS to handle
                os.close(fd_copy)
Rather than using ls or similar, we directly copy the file descriptor to our own process with pidfd_getfd, allowing us to retain that file descriptor even if the victim process closes. Now we can use readlink, and if that points to /etc/shadow, we know we’ve got our target. At this point, the whole shadow file will be read already, so we seek back to the start and return our descriptor for later use.
Writing
Remember CopyFail? We’re now in the perfect position to start writing with it, but how?
Most implementations take a file path, but like I said, most of the time when we deal with the kernel, we’re dealing with file descriptors. When I made RootRemover, I was modifying rootsecdev’s version and changing the bytes it wrote. Here, I have to remove the dependency on a file path. Luckily, this is as simple as removing fd_target = os.open(target_path, os.O_RDONLY); the line that transforms that path into a file descriptor in the first place. From that point onwards it’s file descriptors all the way down; the bug has no reliance on a path.
Now we have to be careful. We have the ability to write 4 bytes at a time and can chain those writes to modify most of the file, but it has to be in-place. We can’t add or remove any text, and hashes can be variable length. If we mess this up, the shadow file may be unusable and we’d have to reboot or clear the page cache to fix it.
The first thing I do is define a function that parses out the shadow file. It generates a dictionary indexed by username, and this dictionary contains both the original hash from the file and the offset of the hash so we can set the address with CopyFail. This records exactly what we’re replacing for each user and where.
1
2
3
4
5
6
7
8
9
10
def get_users_and_offsets(shadow_data: bytes) -> dict[str, tuple[bytes, int]]:
    """Read usernames with passwords from the shadow file.

    Reads through a bytes object containing the shadow file, noting usernames
    that have passwords set. The password hashes of these are read, plus data
    after these such that len(password) % 4 == 0 for usage with CopyFail. The
    offset of the password in the file is added alongside this to the
    dictionary. We assume the shadow file has a valid format.
    """
    ...
Now we know what to replace, we need to generate a password hash that’s the same length. Linux does this using libcrypt and Python used to have a crypt module to interface with this, but it’s now deprecated. For the sake of good practices and minimal external dependencies, I decided to use libcrypt directly via ctypes.
We now reach the point where we have to generate a hash, but what does this thing even mean? How do we get the parameters right?
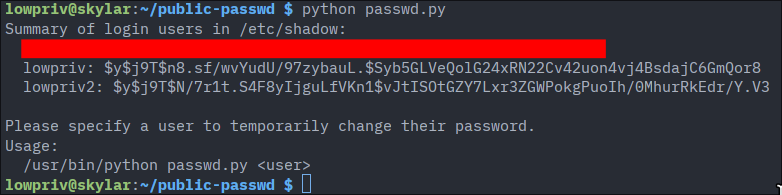 From the demo in GitHub
This can vary a little, but it’s usually something like the following:
1
2
$hash_type$salt$hash
$hash_type$parameters$salt$hash
Most modern distros tend to use yescrypt, which is what you see in that screenshot, but SHA512 is there and somehow MD5 is still kicking.
 Bonus points if you can guess the password
My theory that’s been true so far is that the same parameters and salt should normally generate a hash of the same length. Because of this, PublicPasswd splits the hash by the last ‘$’ and then uses libcrypt.crypt(password, salt) to generate a hash with a custom password and the original salt. We can then pretty easily check that the lengths are the same, then run CopyFail in a loop to write our new password!
And I made an unexpected discovery along the way:
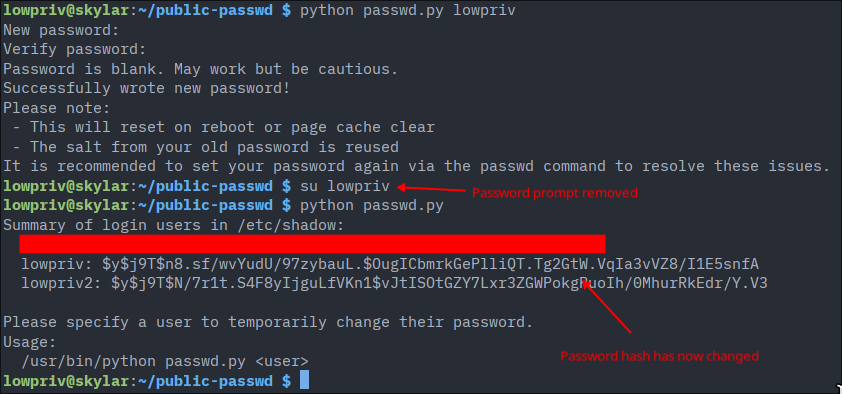
We can still use it to remove the password by entering a blank one and generating a hash for it!
This prevents the password prompt from showing in the first place, and results in an attack tool that has about the same impact as RootRemover, but works on all distros.
Finishing Up
Now all I had to do was tidy up the code and I had a neat little commandline tool. The PoC of CVE-2026-46333 had been written in C, so I had some concerns about winning the race condition in Python, but even after numerous tests it still worked without any issues.
Originally I was just excited to build my first chain of exploits, but I ended up overcoming the issues I found writing RootRemover instead and ended up with a much more effective program than what I expected.
I hope you learned something or found this enjoyable, see you next time!